Friday, July 9, 2010

Winner, Winner, Chicken Dinner!

Good morning, everyone! Today is a good day, thanks to all of you. Two years ago, I started this little blog, not quite knowing where I was headed with it. I just knew I had to do it.

And I’m so glad I did. Writing posts and reading so many by other bloggers has really opened up a new world of possibilities for me, and I am hoping that will continue in the NEXT two years!

Last month, I issued you all a challenge. Granted, I bribed you, but you really came through for me, posting a record number of comments on each and every post over the last four weeks.

And, yes, you shall be rewarded. Or, more specifically, ONE of you shall be rewarded.

I have been saving each and every one of your comments and put them all in a basket last night. Since you’ve all become like friends to me over the last two years, I wanted to do something a little more personal than just plugging you into a random number generator. So, I gave the basket to my Little Man, and told him to close his eyes and pull out one piece of paper. And he did.(here he is in his new favorite outfit, his Toy Story 3 green army guy pajamas, pulling the winning name)

DRUMROLL, PLEASE.....

The winner is.....

KRISTA!Krista won her prize with this comment:
A big congratulations to Krista! She really put in the extra effort on this one, leaving more than 13 comments during the contest, which really ramped up her chances of winning. While she didn’t have the most comments (David came in with more than 20!), in the end, upping her odds really did the trick, as she held a large number of the entries.

You deserve this one, Krista! I hope we get to see some of the tasty treats the come out of it over on your blog! For those of you who missed the Big Reveal earlier this week, this is what Krista will be receiving:
Congrats, again, and thanks to everyone for giving me such a great blogaversary! I’m already looking forward to next year!

Hey Krista – email me your shipping info at bethanneleach@gmail.com so I can get your prize to you in time to use it for all your summer produce!

Thursday, July 8, 2010

Happy Blogaversary to Me!

The day has finally come, everyone! Two years ago today, I started writing, posting pictures and sharing recipes, making this little corner of the blogosphere my very own. It has been wonderful and I have all of you to thank for making it that way.

What does this mean?

Today is the last day to enter my giveaway! Yep, yet your last comment or two in on today’s posts and you may be the lucky winner of my very special prize. I will be drawing the winner’s name tonight, so be sure to get your comments in by mid-day today. Good luck to everyone!

I will post the winner’s name tomorrow morning – stay tuned!

The Basics – Beef Stock

I am a grocery shopping fool, I admit that freely. But one thing I rarely buy is any kind of stock or broth. Why? Because it is so darn easy to make. And cheap, too.

If you’ve never done this, I highly recommend giving it a try. As much soup as I make over the fall and winter months, I go through a LOT of stock. At roughly $2.50 a box, it adds up. Especially when you need 2-3 boxed for a crock pot of soup.

So here’s what I have learned over the years.

Whenever you cook meat (chicken, beef, turkey, whatever) save the bones and extra bits of meat. Roast a chicken, save the carcass. T-bone steaks? Don’t you dare throw those bones out. Turkey? If you don’t use the neck for gravy, pop it in the freezer. Yep, keep a gallon size Ziploc bag in your freezer and just keep adding to it as you accumulate tidbits. I usually tend to throw in a package of soup bones from my freezer as well, just for extra meaty flavor.

Same goes for veggies. You know that bag of carrots in your vegetable drawer that is going dry on you? Stick the whole thing in the freezer. Is your fridge too cold and froze your celery? Add it to the carrots. I even save the ends and peels of onions I chop for other dishes. Garlic that has started growing sprouts, etc....

Then, when you have a bag full of veggies, and a bag or two of bones, you are ready to make stock.

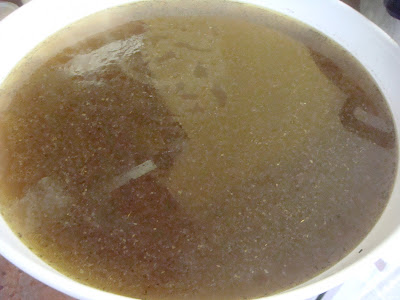
Dump all of your salvaged leftovers into the biggest stock pot you own. Add in an onion or two (quartered, no need to peel) and a head of garlic, sliced horizontally. Toss in some herbs and whole peppercorns. I like making stock in the summer, just because I have a garden full of fresh herbs I can toss in. In my case this weekend, I had a fist full of chives, rosemary, sage, and oregano.Then, fill the pot with water, as full as you can. There is really no recipe for stock, you just use what you have. The only trick is to not add too much water for the amount of food you have in the pot. Start by covering the solids and go maybe another inch or two. Remember, you can always add more water if its too strong, but you can't add flavor if it is too weak.Bring this hodge-podge to a boil, and then reduce the heat and let it simmer for awhile. Like a couple of hours. Basically, you’re sucking the life-blood out of all the bones and veggies, so just let the sucker cook. I think I left mine on for 2-3 hours. If you have a smaller pot than my 20 quart giant, it may not take as long.

Taste the liquid occasionally to make sure you’re getting enough flavor, and feel free to add more herbs or seasonings as necessary. Once you think the concoction is where you want it, turn the heat off and strain off the solids.Then, separate the fat from the liquid either by using a gravy separator, or letting the stock chill and peeling off the layer of fat. I use the first method, since my pot is too big to fit in my fridge. Now, that being said, you don’t have to skim off the fat completely. A little fat gives the stock some flavor, but use your own judgement.

If you’re picky (and I am not) you can strain your stock through cheesecloth or a clean tea towel to strain off any impurities (also known in my house as floaties, or sludge). Personally, I get the biggest stuff out of it, and then leave the rest, because it is also known as “flavor”.

Then, you are done! All you have to do is funnel the stock into jars or other containers (I like the large Glad-lock containers. They hold 4 cups of liquid and the lid screws on tight.) and pop your stock in the freezer. Unless you plan on using a large quantity at one time, I recommend using containers that hold no more than 4-6 cups, otherwise you’ll be defrosting too big a quantity to use at one time. You’re set for soup season!Some people tell me that making stock is too intimidating or time consuming. I will agree, making your own stock does take time, but it is really a hand off process. If you’re going to be at home on a weekend day, all you have to do is pop it on the stove and let it go. Best of all, it is made almost entirely of items you would otherwise have thrown away. Our grandparents had it right – why throw something away that you can use again?

I smell BACON!!! Better with Bacon for I Heart Cooking Clubs

It is true what they say... everything IS better with bacon... but what I want to know is...
WHY THE HELL DIDN’T I THINK OF THIS???
Mark Bittman continues to make me smack my head in a “Coulda had a V8” kind of motion.
I mean, come on....
Bacon.... waffles....
bacon. waffles.
BACON WAFFLES!!!
Seriously, people. I love bacon and I love waffles. I love bacon WITH my waffles... why wouldn’t I have thought of having bacon IN my waffles?? The version of this that I ran across on the internet used a belgian waffle maker, pouring the batter onto the grates, and laying a couple of slices of cooked bacon across the batter before closing the lid.

The recipe originates from Bittman’s How to Cook Everything as a variation on his Quick and Easy Waffles. He offers a basic waffle recipe with eleven, count ‘em, ELEVEN options for variations. I decided to employ two of those variations in the same waffle.

The first of which was to add cheese. I know what you’re thinking, cheese in a waffle? Well, really, when you go through the McDonald’s drive through (and I know you do, you don’t even have to admit it here, I’ll keep your greasy little secret) don’t you ask for your McGriddle with cheese? Or your McMuffin? I know I do. So the combination didn’t seem at all strange to me. Although the hubs did look at me a little funny. I chose to let him stew with it instead of trying to explain my logic to him.

SO, I added about a half a cup of shredded sharp cheddar directly in the batter.

In his suggestion for a bacon waffle, he says (as in the internet version I found) to lay a couple of slices of bacon across the uncooked batter before closing the lid on the waffle iron. He also says the bacon cooks along with the batter, implying that it would be raw bacon I am putting on the waffle batter. Not that I have a problem with raw bacon, I don’t, but in the other version I saw, the writer specifically stated that it was cooked bacon she added. Hmmm...confused.

In either case, I decided that I wasn’t sure if I liked the idea of whole slices of bacon seared to the side of a waffle. I’m envisioning a whole strip breaking loose and hitting me in the chin with a maple syrup coated “thwack!” and frankly, that doesn’t strike me as an appealing scenario. Plus, how do you guarantee that you get bacon in every bite? Or waffle? I was thinking the bacon should complement the waffle, instead of either playing second fiddle, or overshadowing it.

You know what I did? I cooked my bacon up all nice and crispy. Then I crushed it up into yummy little bacon bits. Then I sprinkled the bits over the batter so they would end up in every little crevice of the waffle. The result? Well, you’re just going to have to try it yourself and find out, because you can’t have mine... don’t even try... I WILL stab you with my fork... Its friggin’ genius, is what it is. I’m tempted not to even show you these pictures. But, because I’m a sick, sadistic kind of bitch... I’m going to anyway. Go ahead.... drool.....

Quick and Easy Waffles
from How to Cook Everything by Mark Bittman
canola or other neutral oil for brushing the iron
2 cups flour
½ teaspoon salt
2 TB sugar
3 tsp baking powder
1 ½ cups milk
2 eggs
4 TB butter, melted and cooled
1 tsp vanilla extract, optional
Brush the waffle iron lightly with oil and preheat it.
Combine the dry ingredients. Mix together the milk and eggs. Stir in the butter (and vanilla, if using).
Stir the wet into the dry ingredients. If the mixture seems a little too thick to pour, add a little more milk.
Spread a ladleful or so of batter onto the waffle iron and bake until the waffle is done, usually 3 to 5 minutes, depending on your iron.Variations:Add grated mild cheese, such as Cheddar or Jack, about one cup per batch of batter.
Lay 2 or 3 strips of bacon across the batter after spreading onto the waffle iron and before closing the lid. Bacon will cook along with the waffles; cooking time may be a minute or two longer.

This is my submission for this week's "Better with Bacon" theme for I Heart Cooking Clubs.

Wednesday, July 7, 2010

S'more Krispy Treats

There is a guy that I work with who is just a fool for a rice krispy treat. He even tried to institute a “rice krispy treat day” where we would take turns bringing in rice krispy treats every week on a specific day.

Yeah well, that didn’t fly so well...

BUT. His birthday is this weekend. So, in honor of the Krispy King himself, we decided to surprise him with a “Krispy Treat” buffet for him today at work.

Since I am the kind of person who can never do anything the traditional way, I did a little bit of recipe browsing and came up with an idea from the Kellogg’s website. I think they call them Rice Krispy Chocolate Yummies, or something like that. I call them “S’more Krispies”!

It doesn’t get a whole lot easier than this, and it only took me about ten minutes. I didn’t even need to fire up my oven or stove.
The result? oh dear lordy these were good. And rich. I think you could almost do without the peanut butter because it really pushed it over the top. They were a winner for sure, and a keeper for the recipe box.
(yep, I’m using the picture from the Kellogg’s website. Why? Because mine are all GONE.)

S’more Krispies
· 7 Crackers Keebler® Grahams Original
· 2 1/2 cups miniature marshmallows
· 1 package (12 oz., 2 cups) semi-sweet chocolate morsels
· 2/3 cup light corn syrup
· 3 tablespoons butter or margarine
· 1/2 cup crunchy peanut butter (I used creamy)
· 3 cups Ready-To-Eat Cereal Rice Krispies®

1. Coat 13 x 9 x 2-inch microwave-safe dish with cooking spray. Arrange KEEBLER GRAHAMS ORIGINAL crackers in single layer in dish, breaking crackers as needed to fit. Sprinkle marshmallows evenly over crackers.
2. Microwave on HIGH 1 minute or until marshmallows are puffy. Remove from microwave. Cool completely.

3. In 2-quart microwave-safe mixing bowl combine chocolate morsels, corn syrup and butter. Microwave on HIGH about 1 1/2 minutes or until chocolate is melted, stirring every 30 seconds. Stir in peanut butter. Add KELLOGG'S RICE KRISPIES cereal, mixing until combined.

4. Spread evenly over marshmallows. Cover and refrigerate about 1 hour or until firm. Cut and store in airtight container in refrigerator.

The Ten Spot - Mad Housewife Merlot and Ruby Truffles

A couple of weeks ago, I posted a Ten Spot about the Mad Housewife Cabernet Sauvignon. It was a decent little wine. I will admit, it didn’t excite me, but for under $6 a bottle, it didn’t need to, I was just happy to have a decent bottle to drink that night.

Wasn’t I surprised when a member of the Mad Housewife staff commented on my post! (Hmmm haven’t heard anything about that t-shirt he wanted to send me tho...)

Well, I am all about getting feedback from my fellow bloggers and readers, and it gave me the push I needed to go check out their website, which is not something I normally do when I pick a wine. Lo and behold! They have a FOOD section. Wine and food, two of my favorite diversions in life. I greedily browsed the recipes available there and it didn’t take me long to pick a recipe to try. Why, one that calls for WINE, of course!

I have cooked with wine on numerous occasions, but I am always interested in a dessert recipe that lists wine as an ingredient. And, I found that in their “Ruby Truffles”.

A simple enough recipe, I added the necessary ingredients to my shopping list and headed to the store (oh, darn, I have to buy a bottle of wine...shucks.)

It was a shame that the recipe only called for a half a cup of wine...that left me with almost a whole bottle to do something with. I couldn’t think of anything else, so I rallied my resolve and drank it. It was a real struggle. Italian girl....red wine....yeah, I was devastated. (you really should know how sarcastic I can be by now.)(as you can see, the bottle didn't last long)

And, I have to say, pleasantly surprised! I usually can’t drink Merlot. It’s just too tannic for me and I end up with a raging headache after just a glass or two and a case of the ol’ “black tongue” the next morning. Seriously, after a glass of Merlot, I usually wake up, go to brush my teeth and my tongue looks like it belongs to a victim of the plague. Its nasty.

Doesn’t stop me from trying though.

After my only “average” experience with the Cabernet, I honestly wasn’t expecting more than that from the Merlot, but I am happy to say I underestimated it. Very light on the tannins, and full bodied, I had no trouble at all putting away the rest of the bottle (no, I don’t mean in the fridge, and yes, I’m fully aware that I’m a wino, thankyouverymuch.). There were a lot of great fruit undertones in this bottle and no case of the black tongue the next morning! (yay!) This bottle is in the lineup for my next pasta dish. I think it will lend great flavor to the meat sauce I’ll be making next week.

**DISCLAIMER – no, I am not just saying this to get Mad Housewife to send me a shirt. You all know by now that I am enthusiastic when I like something, and a real bitch when I don’t, so you can be sure I’m nothing if I’m not honest. I was not paid or otherwise compensated for this endorsement. And yes, I really do have another bottle of Merlot on my shopping list. Now...let’s see if I can brave the Chardonnay.

Now! On to the truffles!Let me start by saying, there are very few recipes that are this easy. It’s one of my favorite kinds, much like pesto, where you dump everything into a food processor and give it a whirl. The only spot where I ran into trouble was in forming the balls. The recipe indicated that the dough would be stiff, and it did appear that way in the bowl, but in reality it was too soft to handle. I ended up freezing the dough until it was firmer to form the balls and roll them in sugar. The recipe also says to bring these to room temperature before serving, but honestly, once they start to warm up, they tend to go soft again, so I am serving mine to my co-workers today straight out of the fridge. Maybe I did something wrong, maybe it was just a variation in the brand of vanilla wafers, I don’t know. They were still tasty though! They actually remind me a lot of a recipe from my friend Tara’s mom back in Ohio that she called Pomanders. We always had them at the holidays and they had a base of vanilla wafers as well. So, for me, this recipe was a bit nostalgic and made for quite a sweet afternoon! They are not as rich as a standard truffle, so don’t be expecting that. They do not have the typical chocolate base that you are familiar with, but have a nice dense texture and give off just a hint of the wine.

After making the first batch, I think next time I will try doubling the amount of wine and then reducing it to about half the volume for a more powerful taste. We’ll see how that goes!

Thanks, Mad Housewife, for a nice bottle of wine and a great recipe idea!

“Ruby” Truffles
1 box Nilla Wafers
¾ C powdered sugar
¼ C cocoa powder
3 T light corn syrup
1 tsp. vanilla
½ C Mad Housewife Wine – Merlot
1 C red decorative sugar
In food processor, process wafers to the consistency of coffee grounds; add powdered sugar, cocoa powder, corn syrup, Merlot and vanilla. Process until dough becomes evenly mixed with all ingredients (dough will be stiff). Shape into 1 inch balls and roll in decorative sugar.
Store in covered container in refrigerator. Allow to come to room temperature before serving.

Tuesday, July 6, 2010

The Big Reveal!

Wow. I just have to say, wow! You guys have been so great with this contest I’ve been running. I have seen a huge amount of participation and I just wanted to let you all know how much I appreciate it! There are definitely a couple of “front-runners”, if you will. Not that the person with the most comments wins, but there are definitely couple of stand-outs who CLEARLY want to win the mystery prize.

And, ironically, they both have a very good idea of what the prize is going to be! So, today, I’m going to tell you.

Yes, it’s all about Canning and Preserving.I started off with a fantastic book for the winner. Sherri Brooks Vinton’s "Put 'em Up!: A Comprehensive Home Preserving Guide for the Creative Cook, from Drying and Freezing to Canning and Pickling" which was just published a few weeks ago.

Added to that are some essential canning supplies, including a Ball Canning accessory set, a package of Ball freezer jars, and some canning labels. The winner may even find another surprise or two in the box if I get to feeling frisky before the end of this week.

WHICH REMINDS ME! (Okay, so I didn’t forget. After all, it IS the point of this post...)

Thursday, July 8th is the last day to enter my giveaway! All comments must be posted by noon CST to qualify. And don’t worry, there are still a few more opportunities to get those last comments in before the deadline. I will have at least one new post every day this week.

Friday I will be announcing the winner – stay tuned!