Have a great Holiday season, everyone! See you in 2011!
Monday, December 20, 2010
HAIL TO THE CHIEFS!
Have a great Holiday season, everyone! See you in 2011!
Thursday, June 17, 2010
Bacon Cookies with Maple Icing - Guest Post and a Giveaway Reminder!
Speaking of sweet, check out what she made for me to share with you..... Bacon Cookies with Maple Icing.
Yep, the cooking school where she and I occasionally take classes also has a “cookie club” of sorts and this recipe popped up on my Twitter page last week. Cookies...good. Bacon.....GOOD. Maple.......GOOOOOOD. After recently making chocolate covered bacon
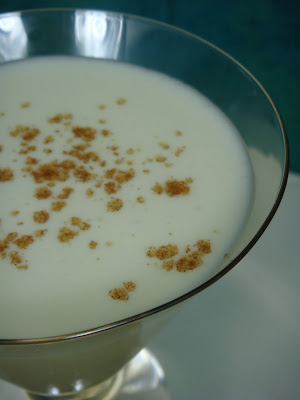
for a friend’s birthday, this was definitely on my “must try” list. I’ve been dying to make these cookies, but since Ginny beat me to it, I’m going to let her tell you about them. But, not before I remind you about my giveaway!
My two year blogaversary giveaway will run through July 8th. Each comment you make on new posts between now and then earns you one entry into the drawing. And just FYI, I think David wants to win. He has never once posted on my blog even though he’s been following it for quite some time, and suddenly he is commenting on about every post. Competition, folks! May the best blogger win! Oh, and here’s a new hint for you...CAN you smell what I am cooking??? (ok, it’s a bad play on “The Rock” but hey, what can I say?)
Now, on to the cookies...here is the post I received from Ginny. Enjoy!
Okay, so I'm intrigued by Bacon. The current movement of using bacon in everything borders on insane. (Bacon salt, Bacon Mayo, Bacon Vodka...) There are just some things that ruin Bacon. That being said, I decided to try these, because as I said, I'm intrigued.
First, there isn't a lot of sugar in these. When I made the dough, it made me think of shortbread. Very dry, mostly fat and flour. Second, it seemed fairly straight-forward. I used a pastry cutter to mix the ingredients together and it worked very well. There wasn't much need to knead, Ha! I just had to form it into the log shape. The most complicated part of the recipe was getting the fine chop on the bacon, in retrospect I should have just given it a whirl in the food processor. I had bacon bits flying everywhere. I'm sure that the cat will find them...
The final results, I liked them. I used a double smoked variety of bacon and it almost seemed that the maple syrup overwhelmed the cookie. You almost wouldn't know the bacon was there. I found that I liked the cookie better with less frosting, and that is not typical for me. As much as I like bacon, I like frosting too, so it was a little surprising to me. Without the frosting they were like a lightly sweet bacon shortbread biscuit.
At this point Beth is saying DUH! because she recalls me telling her that I am not that fond of maple flavored pork products and that I prefer that the maple syrup from my pancakes not touch my sausage or bacon. (Yep, its true, that is one thing Ginny and I disagree on. I love to dip my breakfast meat in my maple syrup, but the very idea of it grosses Ginny out, which is why I was a tad surprised when she decided to make these cookies) If you enjoy that sort of thing, these may be right up your alley.
Bacon Cookies with Maple Icing
4 slices thick cut, lean bacon, finely chopped
2 cups all-purpose flour
1/4 cup sugar
8 tablespoons (1 stick) butter, cut into pieces and softened
1 large egg
3 tablespoons heavy cream
Fry the bacon over medium heat until crisp and then drain on paper towels. In a mixing bowl, combine the flour, butter, egg, and cream and mix until well-blended. Add the bacon and knead until the dough is soft and the bacon is evenly distributed, about 1 minute. Roll the dough into one or two logs about 1 1/2 inches thick. Wrap in plastic wrap and chill until firm, at least 2 hours. Preheat the oven to 350 degrees Fahrenheit.
Cut the dough into 1/4-inch thick slices and arrange the slices about 1 inch apart on a lightly greased cookie sheet (use a bit of the bacon grease or use a silicone mat).Bake until the cookies are firm and very lightly browned (they won’t get golden brown), about 12-15 minutes.Transfer the cookies to a rack to cool.
Then, spread with maple icing and top with a small piece of candied bacon (recipes below).
Maple Icing
Mix a 1/2 cup of powdered sugar with about 3 tablespoons of Grade B real maple syrup (add a bit more sugar, then a bit more syrup until the consistency is spreadable). Ice the cookies when they are cool.
Candied Bacon, aka Pig Candy (optional)
Lay several slices of maple bacon on a silicone-lined sheet pan. Coat each bacon slice with light brown sugar. Bake at 350 degrees until the bacon is crisp, about 25 minutes. The bacon will turn a deep mahogany color; don’t be alarmed. When it’s crisp, let it cool on the rack. Then, cut it into small pieces to put on top of the iced cookies.
~ginny
Here's a quick update from Ginny after she took the cookies in to her guinea pigs, I mean - CO-WORKERS!
Took these to work and yes, people gave me the funny look when I said bacon cookies. That being said, I didn't have one person say they didn't like them. Most thought they were really good, the mildest reaction I got was "Interesting". Not one yuck in the bunch. :-) Most said they wouldn't have known there was bacon in them if I hadn't told them. I even tested it and gave some to people without telling them and they couldn't pick out the secret ingredient. Next time... more bacon, less frosting!
Ok, folks, on that note, I’m off to go fry some bacon! Be on the lookout for another VERY bacon-related post sometime early next week. I have a very pork-fat-friendly surprise in store for the hubs for Fathers Day!Tuesday, April 6, 2010
Grape Juice Tart - a Guest Post from Ginny!
Well, this weekend, Ginny made an absolutely fabulous dessert and I told her she simply had to share it with all of you, right here on my blog. So, without further ado, I’m turning this post over to Ginny.
Ever have something that you love, and yet you wonder what to do with it? That’s where I was. I had grapes last summer from the family vines that I had cooked down, run through the food mill and then placed into the freezer. Typically this stuff gets made into jelly or jam in my family, but since I try to avoid carbs in general, having jelly to put on bread is a bad thing. I wanted to do something else, I just didn’t know what. The freezer is a wonderful thing, it lets you put things off, procrastinate really, something I do very well.
So, while searching Tastespotting, I found a recipe for a grape juice tart. Hmmmm, that sounds interesting! And oddly, it calls for the exact amount of juice waiting for me in the freezer. I have a frozen pie crust waiting to be used also. It’s Kismet!
I made it in time to take to my parent’s home to try out for my nephew’s birthday party. Now, I’ve mentioned before that my family is somewhat leery of new things. But I figure its grape, and my family likes jelly (they make their own), so how wrong can I go. My brother, niece, and nephew wouldn’t try it. Eh, I expected some hesitancy. Mom and Dad thought it was okay. Dad called it interesting, which means I don’t need to bother making it again on his behalf. Mom had a little more when we were having birthday cake. I liked it; it was very grapey without being cloyingly sweet. My soon to be nephew (the niece’s fiancĂ©), Justin, loved it. He ate a quarter of it, refused birthday cake, and asked how much of what was left I was willing to part with. LOL! He ended up with another quarter of the tart to take home. We also discussed what it would be like with other flavors, and since he is a fan of peach, I may try to find peach nectar and make it for his birthday dinner in a couple of weeks. All in all, a win in my book.
Ingredients:
For the short crust pastry:
generous 1 1/4 cups all purpose flour
1 tbsp sugara pinch of salt
45 gm cold butter, diced
2 to 3 tbsp cold water
For the filling:
1 liter dark (or white) grape juice
150 ml milk (3%)
180 ml cream (25% fat)
3 tbsp all purpose flour
1 1/2 tbsp corn starch
1 tbsp butter
1 egg, whisked
2 tbsp sugar (adjust to requirement)
1 1/2 tsp vanilla extract
Method:
Make the crust:
You can do this by hand or in the food processor. I find the food processor excellent for making pie/ tart dough. Sift the flour into a bowl. Add the butter and rub with fingertips into the flour, till the mixture resembles coarse bread crumbs.
Add 2 tbsp water and using your hands, bring the dough together adding a little water if necessary. Too much water will result in a tough pastry.
Turn the dough onto a lightly floured work surface and knead briefly till dough is smooth. Form into a neat ball, flatten into a round, wrap in cling film and chill for at least 30 minutes.
Remove pastry from the fridge and place on lightly floured surface and roll out into a circle about 12” in diameter, slightly larger than a 9” fluted pastry ring/ dish. Roll the pastry in a back and forth motion and do not stretch or pull the pastry.
Place the pastry circle in the ring/ dish and carefully press to the edges, removing excess pastry with a knife. Lightly prick the base with a fork. Chill for about 20 minutes.
Remove from the fridge and line the pastry with foil or waxed paper, and fill with baking beans.
Bake at 200C for 12 minutes. Remove the foil/ waxed paper and put the crust back in the oven for another 10 minutes till golden brown.
Cool on a wire rack.
Make the filling:
Pour the grape juice (one litre) into a pan and bring to a boil. Then turn down the heat to low-medium and simmer, while stirring frequently, till it has reduced to 150 ml. Once the juice has reduced to roughly 1/3rd, watch the pan and its contents or you will end up with a burnt liquid! Let this cool to room temperature.
In a small bowl, whisk the egg, sugar and vanilla extract. Add to the cooked and cooled mixture.Mix well. Now add the reduced grape juice and mix well.
Assembling the tart:
First and foremost, please make sure to convert accurately, I managed fine with the metrics, as a nurse I use the metric system regularly. But for some reason I forgot to convert Celsius to Fahrenheit for the oven temps. I caught this midway through blind baking the crust.
I started out with homemade unsweetened grape juice with pulp. This contains pectin. When I was cooking it down I was pretty sure that it was going to get thick long before I made it down to the 150 ml reduction. I was right; I made it down to just over the 250 ml mark on my measuring cup. I only added about ¼ cup sugar after it was well into the reduction process. I had essentially made jelly. It actually tasted pretty good. Any further attempts at reduction and I would have had taffy. This makes me think that starting out with bottled juice may give different level-of-sweetness results.
So when it came to the “white sauce” I was pretty sure I didn’t want to cook it down to the thick paste consistency the recipe called for. I also used half and half instead of the milk/cream combination. I pulled it from the heat when I started to see the bottom of the pan when I pulled the spatula across the pan. When I added the “grape juice” into the bowl it was still a little thick, so I ended up adding a little more half and half to loosen it up a bit. Considering the increased volume I was worried about over filling the crust, but only slightly, because I tasted the filling to make sure the sugar level was appropriate and it tasted like grape cream – YUMMY! I risked the whole raw egg thing and licked the spatula. It was also this lovely lavender color.
Also, I used an 11 inch tart pan, which resulted in a more shallow tart. (Because that’s what I had!) I don’t think it affected the outcome.
I watched closely in the oven, because I was concerned about the thickening issue and was worried it might either boil over, or seize up and turn to taffy in the crust. No worries, it turned out great! A nice puddingy consistency.
Friday, January 15, 2010
Peppermint Meltaways

1 cup butter, softened
1/2 cup confectioners' sugar
1/2 teaspoon peppermint extract
1-1/4 cups all-purpose flour
1/2 cup cornstarch
Frosting:
2 tablespoons butter, softened
1-1/2 cups confectioners' sugar
2 tablespoons milk
1/4 teaspoon peppermint extract
2 to 3 drops red food coloring, optional
1/2 cup crushed peppermint candies (we used peppermint sugar instead of candy canes)
Directions:
In a small bowl, cream butter and confectioners' sugar until light and fluffy. Beat in extract. Combine flour and cornstarch; gradually add to creamed mixture and mix well.
Shape into 1-in. balls. Place 2 in. apart on ungreased baking sheets. Bake at 350° for 10-12 minutes or until bottoms are lightly browned. Remove to wire racks to cool.

Wednesday, January 6, 2010
Herb Green Ceviche a la Rick Bayless

This ceviche went together in about two minutes (not including the time it took Ginny to put together the herb seasoning that she brought with her).
Herb Green Ceviche
Makes about 4 1/2 cups, enough for 8 as a starter
Recipe from Season 7 of Mexico - One Plate at a Time
Ingredients:
For a scant 1 cup of herb seasoning:
Scallop ceviche:
Directions:
1. Make the herb seasoning. Set a dry skillet over medium heat. Lay in the unpeeled garlic cloves and chiles. Roast, turning frequently, until soft and blotchy brown in spots, about 10 minutes for the chiles and 15 minutes for the garlic. Cool until handleable, then slip the skins off the garlic, pull stems off the chiles and roughly chop (no need to remove the seeds). Place in a food processor along with the cilantro (about 1 cup if packed), parsley (about 1 cup if packed), oil and 2 generous teaspoons salt. Process until nearly smooth (it will be pasty). Scrape into a storage container and refrigerate until serving time.


Monday, January 4, 2010
Missing in Action

In the effort to make a new start, I have lots of pictures piled up from Ginny's recent visit to blog about! As usual, we were cooking fools, but the weekend did have an actual purpose. A dual purpose, even.
See, Ginny and I always get together in December to spend an entire weekend making candy. We then arrange all of the candy on trays to distribute to the various friends and businesses that we have done a lot with over the past year. And, every year, Ginny puts on her "slave driver" hat because I am not as motivated to do all the candy as she is. This year, unfortunately, we had multiple distractions to work around, which didn't help, but we still managed to get all the trays made. For one thing, both of our birthdays land in the general vicinity of Christmas/January, so we decided to treat ourselves to a nice birthday lunch out at a restaurant we've been dying to try since we started attending some cooking classes led by the executive chef and wine director from Annie Gunn's in St Louis.
If a drive to St Louis for lunch wasn't enough of a detour from the weekend's workload, we also were in charge of cooking breakfast for twenty on Sunday morning, my annual Christmas sugar cooking decorating day at my sister in law's....and for some reason, Ginny thought we needed MORE to do, so she brought along about five other recipes she wanted us to try.
What the hell were we thinking?
I guess I should just start from the beginning! The first dish we made (Ginny has recently developed a fascination with Rick Bayless' recipes) was Chilled Shrimp and Crab a la Veracruzana. Talk about an easy dish to make! Ginny made the salsa up ahead of time and brought it with her, so there was almost no prep work to speak of for this one. We snacked on this one the night she arrived with a lovely bottle of wine. I would not have expected that having olives in a latin-inspired dish would appeal to me, but the flavors really worked!
Chilled Shrimp and Crab a la Veracruzana
(Mariscos Frios con Sabor Veracruzano)
Makes about 4 cups
Recipe from Season 7 of Mexico - One Plate at a Time
Ingredients:
2 cups top-quality bottled tomato salsa (I prefer one made from roasted tomatoes)1/4 cup chopped green olives (the firm texture of a manzanilla olive is welcome here)2 tablespoons capers, drained (rinse them in a small strainer if they seem really salty/briny)2 to 3 tablespoons coarsely chopped flat-leaf parsley leaves1 pound medium-to-small cooked shrimp4 or 5 ounces of crabmeat (lump crabmeat holds up best in this preparation)
Directions:
In a medium saucepan, combine the salsa, olives, capers and parsley. Bring to a boil over medium-high heat, simmer for several minutes to blend the flavors (and if the salsa is at all watery, to reduce a little of the liquid), then remove from the heat. Cool to room temperature. In a large bowl, combine the shrimp and crab meat.


Monday, October 19, 2009
Ginny's Special Request - Pumpkin Roll
I made batch after batch throughout the next decade (ok, more than a decade) and it became the most requested recipe in my rapidly growing repertoire. I can't say for sure what the reason behind it was, but I haven't made this in quite a long time. Pumpkin roll burnout? Maybe.... In any case, while we were planning the onslaught of recipes that we planned to make while Ginny was here, this came out as a special request from the lady, herself.
"Can we please make pumpkin roll?"
Wow. Well, YEAH! Of course we can!
Did you know there is a pumpkin shortage this year? That's what my local grocers tell me. It was actually fairly difficult to come by a can of pumpkin pie filling for a little while there, but I got it together and sure enough, we had pumpkin roll. For breakfast.
This is not a difficult recipe, by any means. I think that I must have some particular ways in which I coax and soothe the ingredients after rolling these out in such quantity over the years, that it always just sees to come out better from my kitchen. I even have one tea towel and one jelly roll pan that are reserved strictly for this purpose. When those two items finally see their last days, I don't know what I'll do.
So, if you are looking for a fantastically seasonal dessert (or breakfast) that is bound to satisfy anyone's palate, give this one a shot. It is a tried and true favorite in our house and many others.
Cake:
1 cup sugar
2/3 – 1 cup pumpkin pie filling
1 tsp baking soda
2 TB cinnamon
¾ cup flour
Beat eggs; gradually add sugar. Blend in remaining ingredients. Spread onto a greased, wax-paper lined cookie sheet. Bake at 375 degrees for 12 – 14 minutes. Turn out onto a tea towel covered in powdered sugar.


Filling:
1 – 8 ounce package cream cheese
1-2 teaspoons vanilla
2 TB oleo
1 cup powdered sugar
Cream all ingredients together. Carefully unroll the chilled log. Spread the filling generously on the inside of the log. Re-roll and chill again.


Avocado Smoothies

The next one I am going to share with you is an avocado shake. Now, I love avocado. I like it in salads, love guacamole, and even just as a little treat with salt, pepper and olive oil on a bagel. But I always, always eat it in a savory form. I have seen avocado turned into a sweet treat, usually in some Asian methodology, but I have never considered trying it that way. I just didn't think I'd care for it that way. I don't know why I have put it off, I always claim to be so open minded about food, counting a dish out just because it is out of my normal comfort zone is just not like me. So, when Ginny suggested an avocado shake, well, I had to remind myself of my foodie motto, "Try anything twice, just in case you were wrong the first time."
Looking around on Tastespotting, Ginny found this recipe, and we got the food processor out and put it to work. It turned out this gorgeously creamy concoction that bore a slight resemblance to a facial masque. Probably would have done wonders for my complexion. It was reminiscent of ice cream, but somehow, I felt none of the guilt I normally associate with such decadence.
Coming from the girl who doesn't think she'd like "savory" done "sweet", comes this admission....I was wrong. And you know how I know I was wrong? MY SON ATE IT.

This is definitely a recipe I can recommend and I will be making it again!
(makes 2 servings)
1 large, ripe, avocado
3 tbs of sugar or condensed milk (start with this amount)
1/2 cup half and half (or you can use regular milk)
1 cup of ice (the more ice you use, the thicker it will be)
couple drops of vanilla extract (optional)
Tuesday, October 13, 2009
Cucumber Mint Salsa

Panna Cotta - Guest Post!
When my parents come to visit I like to make things that they wouldn’t normally try, which usually results in research and discussion, because my dad is very meat and potatoes (Ginny and I have this in common with our families). So for dessert I picked Panna Cotta. I had some fresh frozen peaches from my aunt’s tree that were itching for something creamy and I thought that would do the trick. Boy, did it ever! But I’m getting ahead of myself.
Much like Beth, I am a creative cook (and people wonder why we get along so well). My co-workers hate me sometimes when I take food to work (again, common ground). They ask for the recipe and I tell them I can give them the original recipe and then that I didn’t follow that recipe. I doubt anyone at work has ever effectively re-created what I cook.
So, I must have looked at a dozen different recipes for Panna Cotta before I decided how to proceed. The basic concept is warm milk or cream to dissolve the sugar and gelatin (sometimes a flavor of some kind), then add cream/milk/yogurt/sour cream/buttermilk to the gelatin mixture and pour it into either a large container or individual dishes.
My two inspirations were the aforementioned peaches and some amazing cinnamon that Beth and I found at Penzey’s Spices. They have catalogs, are online, or they have retail stores. If there is a store near you, you should take the opportunity and go. They have all the stuff they sell in open containers that you can smell and I suppose if brave enough taste. (You should have seen us slinking around the store in Maplewood, MO, sniffing and making tiny little sounds of pleasure) So if you hear about something and wonder, what is that like? You can find out! It was the Vietnamese Cinnamon that captured us a couple of visits ago, and I have to say, I am in love! (I will never go back to any other kind of cinnamon now. Seriously. I would just throw out any other kind you have in your spice rack and buy some of this. Now.) I have always liked cinnamon, but this makes your mouth say WOW, that’s some cinnamon! I’ve been putting it in everything. I found no recipes involving cinnamon, so I was on my own. I am undaunted!
(Here is the basic recipe for the panna cotta we made.)
In a mixing bowl “bloom” one packet of plain gelatin in 2-3 Tablespoons of cold water. (If you don't know about "blooming", it just means to gently mix the two together and let it rest for a minute to give the gelatin a chance to "activate" kind of like yeast does.)
In a saucepan heat:
1 ½ cups half and half
2/3 Cup Sugar
½ - 1 tsp Cinnamon (the Vietnamese Cinnamon is strong, so I used ½ tsp).
Heat gently until the sugar is dissolved. (I allowed some time for the cinnamon to steep in the milk.) Do not boil. Pour this mixture into the bowl with the gelatin and whisk until the gelatin is dissolved.
Add 1 ¼ Cup of sour cream and 1 tsp vanilla and whisk until well blended. Pour into serving container. Refrigerate until set.
I have to say I made two batches for the parents visit, because the first batch was small, and my family likes to eat, so… I liked my second batch better, which I of course altered slightly. I tested the first batch and it was a little more solid than I would have liked, so in the second batch I used less gelatin. The above is the second attempt. My nephew asked me what it was; the best I could come up with was “it’s like milk jello”. (I don't know about you, but "milk jello" would not entice me into trying something new.) BTW, I don’t like jello, not since a high school cafeteria incident, so this was a big experiment for me. This is why I used less gelatin in the second batch. This was amazing with the peaches!
I liked it so well that I knew I had to make it again when Beth and I got together. However, it was time for another variation. This time we used ginger instead of cinnamon. (Ginny didn't say this, but she has a nearly obscene fetish for ginger.)
In a mixing bowl, bloom one packet of gelatin in 2-3 Tablespoons cold water.
In a saucepan heat 1 ½ cups half and half with ½ Cup Sugar and grate about 1-2 tsp fresh ginger into the pan (this will depend on how much you like ginger). After the ginger gets a chance to steep in the milk, pour the mixture through a fine mesh sieve into the mixing bowl. Whisk to dissolve the gelatin.
Add 1 ½ cups of buttermilk and 1 tsp vanilla and pour into serving container. Refrigerate until set.
We served this with some fresh pineapple and it was fabulous! I have to say even Beth was amazed when I asked her for the glasses that we were serving this in. Done already?! (yeah, yeah, know-it-all, I was surprised, I admit it.) There are times when you read how easy something is to make, but no lie, this is a fast and easy dessert! I still want to try this with a Greek Yogurt variation, I just have to decide what other spice to use with it…sweet, maybe savory, who knows? (I could totally see a basil-tangerine variation....although I can see us trying something like rosemary-parmesan. Ginny is a freak about rosemary, too.)
So, the picture above is the original shot Ginny took of the batch she made for her family, and the rest of the pics are the version we made at my house. It was really amazing, and as Ginny said, incredibly easy! See if you can come up with a new variation and let us know how it works out!
Monday, October 12, 2009
Crème Brulee – Nigella Lawson
However, in the event that the establishment has Creme Brulee on the menu, all bets are off. Don't even bother pouring any kind of sauce over it, and leave any gratuitous fruit back in the kitchen, we don't want it. A creme brulee is done right, it doesn't need any embellishment, and if it does, well, you can keep it.
I still haven't officially signed up for the I Heart Cooking Clubs group, but I heard that they recently chose "comfort food" as their theme for a recent Nigella Lawson tribute. Usually, comfort food says "savory", "gravy", "pasta" or some other version of those things. But Creme Brulee....well, I don't care who you are, it just makes you feel good all over. I think this one qualifies equally well for this week's theme, "Midnight Sneaks". If, on the off chance that there was any of this leftover in my fridge, it would definitely be worth sneaking down to the kitchen for, late, late at night. So, Ginny broke out the torch I bought her a few years ago for this very purpose, and we were on a mission for Creme Brulee.
This recipe calls for eight (count 'em EIGHT!) egg yolks, which therefore left us with eight unused egg whites. We set those aside and saved them for another project that you'll be hearing about soon as well.
DISCLAIMER: The lovely pictures you are about to see were not out first attempt. We were overly confident and although I don't think either one of us can pinpoint exactly where we erred, but the first batch turned into a scrambled egg custard before we could get it in the oven.
It was disgusting.
But, try, try again, they always say, and we are not easily deterred from Creme Brulee, so we persevered. And our efforts were rewarded with this:

Creme Brulee
2 1/2 cups heavy cream
1 vanilla bean
8 egg yolks
3 generous tablespoons granulated sugar
Approximately 6 tablespoons Demerara or granulated brown sugar
Directions
Put a pie dish of about 8-inches in diameter in the freezer for at least 20 minutes. Half-fill the sink with cold water. (yeah, ok, we didn't bother with the sink of water.) This is just a precaution in case the custard looks as if it's about to split, in which case you should plunge the pan into the water and whisk the custard. I'm not saying it will - with so many egg yolks in the rich cream, it thickens quickly and easily enough - but I always feel better if I've done this.
Put the cream and vanilla bean (she never talks about splitting the bean and scraping out the seeds, but we are not of the mind to waste a perfectly good vanilla bean, so we split ours and scraped out the seeds before adding it to the cream) into a saucepan and bring to the boiling point, but do not let boil. Beat the eggs and sugar together in a bowl, and, still beating, pour the flavored cream over it, bean and all.

When the cream's thick enough, take out the vanilla bean, retrieve the pie dish and pour the creme into the severely chilled container.

Put back in the refrigerator if you want, but remember to take it out a good 20 minutes before serving. At which stage, put the bowl on the table and, with a large spoon and unchecked greed, crack through the sugary carapace and delve into the satin-velvet, vanilla-speckled cream beneath. No more talking: just eat.

And that's just what we did. We brought the chilled dish out of the fridge and then torched it there at the kitchen table until it was caramelly and gorgeous, and then we demolished it. Yes, the entire thing, in one sitting, between the three of us. I was proud of Whitney, the girl can throw down. She wasn't shy about going back for seconds, and I have a new respect for the girl.
Rock on, Nigella!
Thursday, October 8, 2009
Its On the Tip of My Tongue...
With Ginny’s impending visit this past weekend, we decided to test ourselves. We each brought six ingredients, and chopped, smushed, or otherwise disguised them so that they would not be identifiable by shape or texture alone. We tried to stick to basic foods, not getting too exotic, but also not wasting our efforts on something really obvious, like a banana.
Here are the results!
Ginny presented her tray first:
brazil nuts – got it on the 1st try.
tangerine – 1st try again!
pastrami – took awhile, but I eventually got it.
muenster – not sure if I’ve ever had muenster before, never got this one.
sprouts – Didn’t even have to taste this one, just the smell gave it away for me.
capers – this one I really should have gotten, but the texture kept throwing me. Kicked myself for it, but I never got it.
Then it was my turn:
hazelnuts – took a little while, but she eventually got it.
kiwi – got it on the first try.
buttermilk – no problem at all.
provolone cheese – took a while. She was convinced it was mozzarella, but she got it eventually.
black beans – got it on the second guess.
shrimp – easy peasy! Got it on the first guess.
Over all, I’d say we both did pretty well! We now remain confident that we rule supreme, as was expected. How would you do?
Monday, October 5, 2009
TFF - French Onion Soup

Well, it would be, except that after the servings that Ginny and I slurped down, it only left me with four pint jars. So, what began with what appeared to be a huge amount of onions turned into a fairly small amount of soup. This shouldn't have been a surprise, its not like I haven't made french onion soup before, but I guess I was hoping for more. Also, I used more onions and beef stock that the recipe called for.
Since Tyler Florence Fridays is going to be wrapping up soon, I want to get as many posts in as possible this month, so I found Tyler's recipe for French Onion Soup from the Food Network. It turned out very nicely, and we couldn't wait to break through that layer of cheese (I used provolone since I bought it for the Blind Taste Test) and baguette. Also, my broiler doesn't work, never has, so since Ginny brought her torch for the Creme Brulee that I'll be posting later, we used that to work the cheese over.
Isn't today the perfect day for soup? I thought so, too. While I was running errands over lunch yesterday, in the rain, I couldn't help but think, "Soup Day." Yep, we have a tradition in my office (I work in a group lab with several other people) that when we all start to get chilled and the weather is getting us down, we have Soup Day. Everyone brings in soup, or something to go with soup, like crackers, or dessert, and we shake off the chill together while drowning our sorrows in a bowl (or six) of hot, steamy goodness. We have a small group right now, but it couldn't have been a better day for it as we've had nearly three inches of rain over the last 48 hours, and on top of that....its Friday. So today I have a big crock pot of Pasta e Fagioli, and some impromptu Chicken Noodle soup (I snagged a couple of pieces of leftover grilled chicken from our office cookout yesterday).
Soup's On, Everyone!
1/2 cup unsalted butter
4 onions, sliced
2 garlic cloves, chopped
2 bay leaves
2 fresh thyme sprigs
Kosher salt and freshly ground black pepper
1 cup red wine, about 1/2 bottle
3 heaping tablespoons all-purpose flour
2 quarts beef broth
1 baguette, sliced
1/2 pound grated Gruyere
Directions
Melt the stick of butter in a large pot over medium heat.


When you're ready to eat, preheat the broiler. Arrange the baguette slices on a baking sheet in a single layer.

Ladle the soup in bowls and float several of the Gruyere croutons on top.


Monday, May 18, 2009
A Whirlwind of a Weekend
This “girls” weekend was meant to be a relatively short, sedate weekend, just centered around a cooking class we had signed up for in St Louis. However, true to form, our plans rapidly spun out of control as we began adding activities to the agenda, even adding an entire day to the visit. Here’s a recap of some of the fun!
Magnolia’s


Even though we had quite a full day on Friday, Saturday was really the meat of the weekend, with a trip to St Louis in store for us. The day started with a trip to the Soulard Farmer’s Market, where we picked up some lovely cherries, avocados, gourmet pasta from Pappardelle’s, and some gorgeous basil plants to supplement my garden.
After the farmer’s market, we headed straight over to Maplewood to pick up a few things at Penzey’s Spices, including some really pungent Vietnamese Cinnamon, some English Prime Rib Rub (the reason for the visit), and a few other tasty items.
We headed from Penzey’s around the corner, and signed up for a tour at the Schlafly Bottleworks. If you aren’t familiar with Schlafly’s beer, well, frankly you are just missing out. They have a number of regular brews, including Gin’s favorite, the Dry Hopped APA, and mine, the Oatmeal Stout, as well as some seasonal beers, including a hard cherry cider, which was fantastic.
There was quite a demand for the tour that day, so even though we arrived in plenty of time for the 3 o’clock run, we couldn’t fit in the group, so we signed up for the 4 o’clock and had “lunch” in the restaurant while we were waiting. The menu there is absolutely phenomenal, and we started with a flight of beers each, and then sampled a few other items from the menu to share. Here are a few shots for you to drool over.


(Sorry I didn’t mention more of the technical details of the tour, Stuart, it really was great, but there’s been a lot of beer under the bridge since then!)
Girls Night out: Napa
The main purpose of this visit was a cooking class Ginny and I decided to sign up for. We’d been to a class at the Kitchen Conservatory in February and couldn’t wait to go back. We’ve decided that we are going to make these classes a regular part of every visit she makes out here. This class was actually a demo (versus hands-on), so we all got to sit back and relax while Chef Christie prepared some lovely treats for us and we enjoyed a few classes of wine (are you sensing a theme for our day out). On the menu was a Blue Cheese en Croute,


The same chef (and wine director) that put on the last class we went to will be back at the end of July for another round, and we have already decided that attendance is a must! So, you’ll be getting another review in July.
The last day of Ginny’s visit, we spent more time relaxing than the others, but still managed to whip up a lovely meal of Pesto Marinated Flank Steak paired with a wonderful fresh pasta Gin brought out with her which we tossed with sautĂ©ed broccoli rabe and three peppers, and a sauce I picked up at the Hill in St Louis (our own version of Little Italy) that was actually a red pepper and pine nut bruschetta topping, but it went along famously with the pasta and peppers. What do you think? Doesn’t it look amazing?

